
Monitoring batch jobs is a critical task in any Dynamics 365 Finance & Operations environment. One effective way to stay informed about issues is by setting up email alerts specifically for failed batch jobs. This blog walks you through the setup process and highlights an optional customization to capture detailed failure information.
Prerequisites
Before enabling batch email alerts, ensure the following configurations are complete:
- Email Parameters Configuration
First, configure the system-wide email parameters by following the steps outlined in the official Microsoft documentation:
Configure email parameters in D365 F&O - User Email Provider Setup
Once the global email setup is complete, navigate to:
User Options > Account > Email provider selection
Here, configure:- Email Provider ID
- Sender Email (typically your logged-in user email)
This implementation leverages a utility class named DFTGetInfologMessages, previously detailed in an earlier blog post.
Enabling Batch Email Alerts
With the above configurations in place, you can now enable alerts for batch jobs:
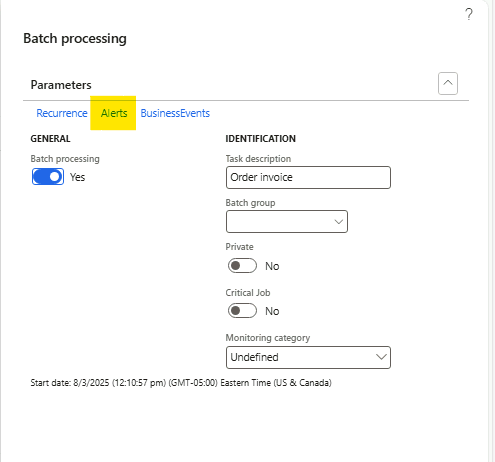
- Navigate to System administration > Inquiries > Batch jobs
- Select the batch job you want to monitor
- Click on the Alerts button in the Action Pane
- Enable relevant conditions; for failure notifications, set the Error and Email flags to Yes

You can enable alerts for both new and already scheduled batch jobs.
More details on configuring alerts are available here:
👉 Manage alerts in Dynamics 365 F&O
Standard vs Custom Email Alert Details
By default, standard email alerts in D365 F&O provide only high-level information about batch job failures—often not enough for deep troubleshooting. If your business requires more granular details (like error messages or failed task data), consider implementing a small customization to enhance the alert payload. This approach allows tailoring the email content based on specific business requirements.
Step-by-Step Customization Guide
1. Create a Temporary Table
This table will store detailed failure messages to be included in the email body.
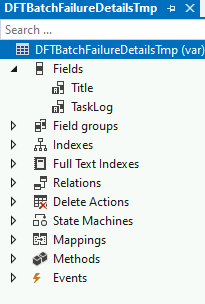
- Name: DFTBatchFailureDetailsTmp
- Fields:
- Title
- TaskLog
2. Extend System Parameters Table
- You can use any global configuration table or create a dedicated extension to manage email settings.
- Add the following fields to your table extension:
- EnableBatchEmailTemplate
- Type: Enum (NoYes)
- EDT: NoYesId
- Label: Enable custom email template
- Help Text: Enabling this flag will send email in custom template format for failed batch jobs.
- BatchEmailText
- EDT: smmCampaignBroadcastText
- Help Text: Email body text for batch job alert
- EnableBatchEmailTemplate
3. Expose Custom Fields to the UI
- Extend the relevant form to include these new fields, allowing system admins to configure the alert settings directly from the user interface.
Add below html text in BatchEmailText and set EnableBatchEmailTemplate flag value to Yes.
<html>
<head>
  <meta charset="UTF-8">
  <style>
    body {
      font-family: Arial, sans-serif;
      color: #333;
    }
    p {
      line-height: 1.6;
    }
    .section-title {
      font-weight: bold;
      margin-top: 20px;
    }
    ul {
      margin: 0;
      padding-left: 20px;
    }
  </style>
</head>
<body>
  <p>Below batch job has been failed.</p>

  <p><strong>Job Name:</strong> %1</p>

  <p><strong>Failure Timestamp:</strong> %2</p>

  <p><strong>Failure Details:</strong></p>
  <table border="1" cellpadding="8" cellspacing="0" style="border-collapse: collapse; font-family: Arial, sans-serif;">
    <tr style="background-color: #f2f2f2;">
      <th>Title</th>
      <th>Details</th>
    </tr>
    %3
  </table>


  <p>Please review the batch job history in Dynamics.</p>


 <p>Regards,<br/>XYZ</p>
</body>
</html>
4. Customize the Email Notification Logic
- Create a CoC (Chain of Command) extension for the EventNotificationBatch class.
- Override the logic to replace the default email body with a custom HTML/text body using the values from your temporary table and configuration.
/// <summary>
/// Extension class for <c>EventNotificationBatch</c>
/// </summary>
/// <remarks>N developed for BatchEmailAlert by RhushikeshR</remarks>
[ExtensionOf(classStr(EventNotificationBatch))]
final class DFTEventNotificationBatch_Extension
{
    /// <summary>
    /// Creates an in-memory message.
    /// CoC method for newInfo
    /// </summary>
    /// <param name="_userId">
    /// The user who will receive the message notification.
    /// </param>
    /// <param name="_subject">
    /// The subject of the message.
    /// </param>
    /// <param name="_menuFunction">
    /// The menu function to start when you open the message.
    /// </param>
    /// <param name="_record">
    /// The record that caused this message to be generated.
    /// </param>
    /// <param name="_showPopup">
    /// A <c>NoYes</c> enumeration value that determines whether the client should display a message popup.
    /// </param>
    /// <param name="_sendEmail">
    /// A <c>NoYes</c> enumeration value that determines whether an e-mail should be sent.
    /// </param>
    /// <param name="_emailAddress">
    /// The e-mail address to which to send the message.
    /// </param>
    /// <param name="_company">
    /// The company from which the message was generated.
    /// </param>
    /// <param name="_alertCreatedDateTime">
    /// The message creation date and time.
    /// </param>
    /// <param name="_message">
    /// The message for the message; optional.
    /// </param>
    /// <param name="_partitionKey">
    /// The partition where the message should be created; optional.
    /// </param>
    /// <remarks>
    /// The <c>newInfo</c> method sets in-memory parameters. To persist them, call the <c>create</c> method.
    /// </remarks>
    public void newInfo(userId _userId,
                            EventSubject _subject,
                            MenuFunction _menuFunction,
                            Common _record,
                            NoYes _showPopup,
                            NoYes _sendEmail,
                            Email  _emailAddress,
                            dataAreaId _company,
                            utcdatetime _alertCreatedDateTime,
                            EventMessage _message,
                            PartitionKey _partitionKey
                        )

    {
        next newInfo(_userId,
                     _subject,
                     _menuFunction,
                     _record,
                     _showPopup,
                     _sendEmail,
                     _emailAddress,
                     _company,
                     _alertCreatedDateTime,
                     _message,
                    _partitionKey);

        SystemParameters systemParameters;
        smmCampaignBroadcastText emailText;
        boolean enableCustomEmailTemplate;

        changecompany(_company)
        {
            select firstonly systemParameters
                where systemParameters.DataAreaId == _company;

            enableCustomEmailTemplate = systemParameters.EnableBatchEmailTemplate;
            emailText = systemParameters.BatchEmailText;
        }

        if (_record.TableId == tableNum(BatchJobHistory) && enableCustomEmailTemplate)
        {
            BatchJobHistory batchJobHistoryLog = _record;

            if (batchJobHistoryLog.Status == BatchStatus::Error)
            {
                inbox = null;
                inbox.NotificationSource = EventNotificationSource::Alerts;

                this.parmNotificationType(EventNotificationType::Information);

                this.parmUserId(_userId);
                this.parmSubject(_subject);
                this.parmMenuFunction(_menuFunction);
                this.parmRecord(_record);
                this.parmShowPopup(_showPopup);
                this.parmCompany(_company);
                this.parmAlertCreatedDateTime(_alertCreatedDateTime);
                this.parmEmail(_emailAddress);
                this.parmSendEmail(_sendEmail);
                this.parmPartitionKey(_partitionKey);
                this.parmMessage(this.dftGetEmailBodyWithLog(batchJobHistoryLog, emailText));
            }
        }

    }

    /// <summary>
    /// get email body for failure email of batch
    /// </summary>
    /// <param name = "_batchJobHistory">buffer of <c>BatchJobHistory</c></param>
    /// <param name = "_emailTemplate">email template</param>
    /// <returns>email body with batch details</returns>
    private DFTIntegrationStatusMessage dftGetEmailBodyWithLog(BatchJobHistory _batchJobHistory, smmCampaignBroadcastText _emailTemplate)
    {
        InfologData                     data;
        DFTGetInfologMessages           getInfologMessages = DFTGetInfologMessages::construct();
        DFTIntegrationStatusMessage     mergedInfo;
        smmCampaignBroadcastText        emailText;
        DFTBatchFailureDetailsTmp       batchFailureDetailsTmp;

        data = BatchJobHistory::showLog(_batchJobHistory.RecId);

        int countItems = conlen(data);

        for(int i = 1; i <= countItems; i += 3)
        {
            var infologContainer = conPeek(data, i+2);

            if (conLen(infologContainer) == 0)
            {
                continue;
            }
            else
            {
                str title = strFmt("@SYS107863", conpeek(data, i), int642str(conpeek(data, i+1)));

                DFTIntegrationStatusMessage taskLog = getInfologMessages.getAllMessages(infologContainer);

                batchFailureDetailsTmp.Title = title;
                batchFailureDetailsTmp.TaskLog = taskLog;
                batchFailureDetailsTmp.insert();
            }
        }

        str batchJobCaption = _batchJobHistory.Caption + ' (' + any2Str(_batchJobHistory.BatchJobId) + ')';

        DateTimeExecuted dateTimeExecution = DateTimeUtil::applyTimeZoneOffset(_batchJobHistory.EndDateTime, DateTimeUtil::getCompanyTimeZone());

        emailText = strFmt(_emailTemplate, batchJobCaption, dateTimeExecution, this.getBatchLogTableForEmail(batchFailureDetailsTmp));

        return emailText;
    }

    /// <summary>
    /// Generates an HTML row string with batch failure details
    /// </summary>
    /// <returns>HTML-formatted string of table rows with batch failure details</returns>
    private str getBatchLogTableForEmail(DFTBatchFailureDetailsTmp _batchFailureDetailsTmp)
    {
        str                     htmlRow;

        while select _batchFailureDetailsTmp
        {
            if (htmlRow == '')
            {
                htmlRow  = '<tr>';
            }
            else
            {
                htmlRow  += '<tr>';
            }

            htmlRow += strFmt('<td>%1</td>', _batchFailureDetailsTmp.Title);
            htmlRow += strFmt('<td>%1</td>', _batchFailureDetailsTmp.TaskLog);
            htmlRow += '</tr>';
        }

        return htmlRow;
    }

}
Once this setup is in place and the custom email template option is enabled, the system will automatically send detailed failure information through email, offering greater insight than standard alerts.
This solution empowers admins and support teams to act quickly and efficiently by providing actionable failure details—without having to manually investigate each batch job issue.
Keep your operations running smoothly by proactively monitoring failed batch jobs—and don’t hesitate to customize when the out-of-box solution falls short!
#Xpp #D365FO #ERP #BatchJob #Integration

